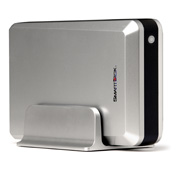
I was low on disk space for photos and music, so in a whim I bought a “Verbatim SmartDisk NAS External Harddrive” from where I usually buy blank media. It had a decent size, it wasn’t expensive and it supported NFS.
The first thing I did was to reformat the drive as ext3 in stead of the default vfat. I then enabled NFS and created two users and tried it from my Debian/Gnome laptop.
Then everything went wrong. The user specific folders didn’t show up for NFS, though they did for CIFS. If I tried to copy files over from my desktop via CIFS the NAS blocked immediately. It worked from a Mac though. Ownership and permissions were a mess between CIFS and NFS. In short, it didn’t work very well.
It took quite some time and effort to sort it out, and a bit of tweaking too.
I first wanted to use NFS because I have Linux and Mac OS X clients, but immediately ran into the usual problem of mismatched user ids and there was no way on the NAS to adjust that. It could have worked if I could use NFS exclusively, but I still need CIFS to work, also on shared directories.
Also, user specific mounts didn’t appear as NFS mounts, only as CIFS shares. I could work around that, however, by creating an NFS mount with the same name and location as the user share.
Then I tried to use CIFS on Linux but the default of using some Unix extensions to CIFS carried the user id problem over there too. Besides that, the NAS would block as soon as I tried to write to the disk through CIFS. It would write 8kb of the first file and then block everything.
Somehow I figured out that the default Linux CIFS settings caused the NAS to block due to byte range locking, and once I changed my automounter setup, it worked a bit better. There was also a character set problem between NFS and CIFS, but that was easily fixed. The line in /etc/auto.master
/smb /etc/auto.smb nobrl,iocharset=utf8
must have the final “nobrl,iocharset=utf8” added to disable byte range locks and fix character translation in file names.
I also found a way to disable the Unix extensions to CIFS, but again it completely messed up interaction with NFS due to differences in user ids.
In the end I used a bit of brute force to get all combinations of Linux and Mac OS X, and NFS and CIFS to play together. I found a way to get enable telnet on the NAS, there was no root password, and I edited /etc/passwd and changed the user ids of the users to match what I have on the other systems. That did it.
The address to enable telnet on the NAS is http://sohonas/cgi/telnet/telnet.cgi
Leave a Reply